Tuesday, May 31, 2011

What's Cooking in the Garden?

I haven't blogged in about a week and I am starting to feel really bad about it. Although I have been cooking, I put in almost 50 hours at work last week, which included two back to back evenings. Safe to say I have been pressed for time, and therefore my poor blog has suffered. A couple exciting things did happen to me during the last week, I crashed my first wedding (long story) and despite the odd rain in May, my garden has really taken off! Here's a look at the beautiful blooms I have been enjoying over the last couple of weeks.

Photobucket
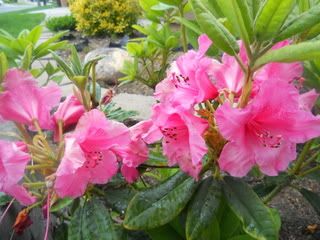
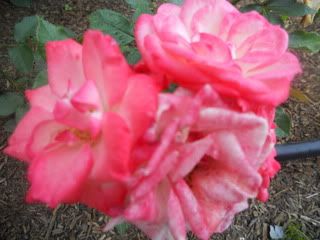
Can you guess what these are? If you think you know, please take a guess in the comment section. These sunburst hot pink beauties are bursting with color and usually bloom for about one month. They're pretty low maintenance and beautiful to behold.

Photobucket
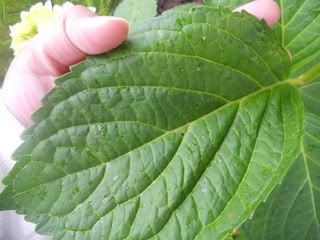
I've had this popular bloom in my garden for two years now and I was astonished at how huge the leaves grew to this year. Can you see my entire hand behind this monstrosity? Many of you should be able to tell exactly what these are just by glancing at the leaf.

Photobucket
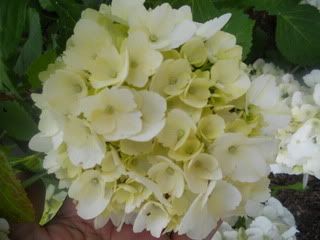
Beautiful hydrangeas! I have two white plants and one pink plant. My white hydrangeas are covered in flowers and buds that are ready to burst, however...

Photobucket
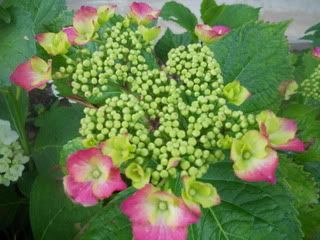
my pink hydrangeas are barely starting to open. Here's a fun fact about hydrangeas you may or may not know, you can control their color and actually change it. The pink can change to blue or blue to pink, however the white hydrangeas are constant, therefore you can not change their color.

Photobucket
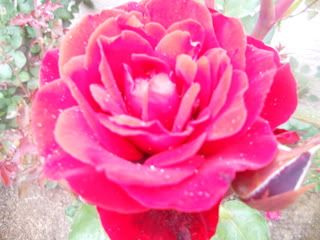
Red roses, my absolute favorite. I took this photo right after a light rain earlier today.

Photobucket
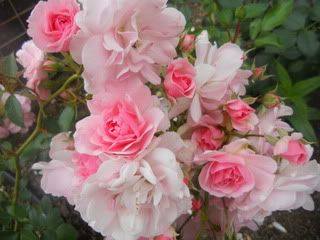
Clustered blushing beauties.

Photobucket
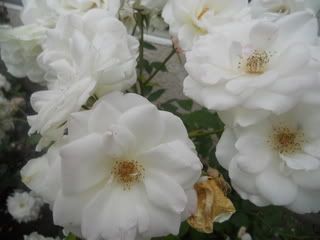
Clean, crisp and fragrant clustering white roses.

Photobucket
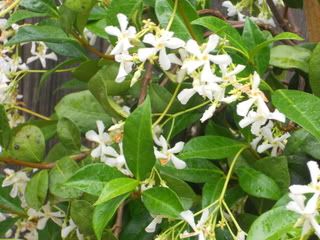
The small star-shaped scented jasmine.
Photobucket
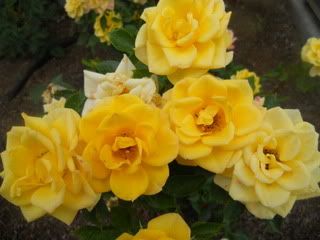
These look like regular size roses but they're actually mini-roses. I just love 'em, they're so cute!

Photobucket
Another one of my mini-roses, in a dark shade of pink.

I've mentioned here, many times before, that I am not an avid gardener. I wish I could tell you the exact names and species of all the beautiful blooms in my garden but I can't. My philosophy is, if I like it, I want it in my garden. Then I plant it, do some research, follow directions and hope for the best.
What's blooming in your neck of the woods?

Sunday, May 22, 2011

Indian-Style Tandoori Chicken & Shrimp

Photobucket

No clay oven? No problem. Every time I go to an Indian restaurant I can't resist ordering something off the Tandoor section of the menu. So today, I decided, it was time to try my own! Tandoor style chicken and shrimp not made in a traditional cylindrical clay oven, but on my propane burning grill. In order to establish a non-partisan vote on the Tandoor dishes I was embarking upon cooking, I invited my mom for dinner. Anyone that knows my mom knows, when it comes to cooking and food (or anything in my life) she has a tough as nails attitude. The dishes were a success with my family and might I add,  pretty simple. Here's my take on tandoori chicken & shrimp, something tells me, Tandoor cooking and I are going to be great friends. Don't be surprised if you see another form of this dish here in the near future. Enjoy!

Serves 4-6
Photobucket
The ingredients:

- 1 whole fryer chicken cut into 8 pieces
- 1 lb. of jumbo tail-on prawns (deveined)
- 1 1/2 cup of Greek yogurt
- 1 tsp. garlic powder
- 1 tsp. onion powder
- 2 tsp. paprika
- 1 tbsp. ground cumin 
- 1/2 tsp. cayenne pepper
- 2 tbsp. curry powder (mixed) 
- 1/2 a scotch bonnet pepper
- 1 lemon (juiced)
- salt
- pepper
- bamboo skewers (soaked)


Photobucket
Begin by arranging your chicken pieces in a baking dish.

Photobucket
Then begin assembling the marinade for the chicken in a food processor. First add all of the dry spices and the pepper.

Photobucket
Add the lemon juice, and pulse until a thick paste forms.

Photobucket
Add in the yogurt and pulse until combined, if the marinade is too thick add more yogurt. Pour the marinade over the chicken and cover with plastic wrap. Place in the refrigerator for at least 2 hours. 

Repeat the steps above to make the shrimp marinade.

Photobucket
When the second batch of marinade is done, pour it over the shrimp, cover and place in the refrigerator.

Two hours later...

Photobucket
Remove the chicken from the refrigerator and begin inserting skewers through the chicken. Then skewer the shrimp, I added 3-4 shrimps per skewer.

Photobucket
Place the skewered chicken on a prepared grill coated with nonstick spray, on medium/low heat. Cover the grill top for 5-7 minutes, then flip the chicken over, cover and cook again.

Photobucket
Yummy!

Photobucket
Remove the chicken from heat when juices run clear and place cooked chicken on a tray lined with aluminum foil.

Photobucket
Then place the skewered shrimp on the grill, cover and cook for three minutes.

Photobucket
After three minutes, flip the skewers over and cook for another two minutes. Remove the shrimp skewers from heat and set aside.

Photobucket
Serve tandoori chicken and shrimp with saffron rice and a spicy mint chutney, so good!

Thursday, May 19, 2011

Country Fried Chicken & Potatoes

Photobucket

Country fried chicken, and that's exactly what it is, chicken, served with bite-sized bursting with flavor red potatoes. It seems like a lot of trouble to go to on a weeknight, and believe me it was, but the ends definitely justified the means. Please don't let the long ingredient list or lengthy prep time, (I'm giving this one a full 60 minutes suggested cook and prep time) turn you off. This dish is a must make. Juicy, tender chicken with a flavor packed punch. I whipped up a quick chicken gravy to go with the meal, (because you can't have chicken fried chicken without gravy) whose recipe I did not include because this is already a pretty lengthy post, sorry! If you must know how I did it feel free to ask, I would love to have more comments! This was the most comforting meal I've had in a long time not to mention the chicken was finger lickin' good!

Serves 6-8
Photobucket
Here's the long but totally worth it, ingredient list:

- 6 Boneless, skinless chicken breasts
- 3 eggs
- 1 cup all purpose flour
- 2 tbsp. fresh dill (chopped)
- 1 cup plain bread crumbs
- 1/2 cup milk
- 32 oz. package of chicken stock
- 7 red potatoes 
- 2 tbsp. paprika
- 1 tbsp. onion powder
- 1 tbsp. garlic powder
- 1 tsp. cayenne peppper
- 2 tbsp. dried parsley flakes
- salt
- freshly cracked black pepper
- 1/4 cup vegetable oil
- 1/4 cup (good quality) extra virgin olive oil

Photobucket
Begin by splitting your potatoes into equal quarters, if your potatoes are on the larger side, split them into eighths.

Photobucket
Place you potatoes in a large stockpot.

Photobucket
Add in the chicken stock.

Photobucket
You should have a pretty even potato to chicken stock ratio. Place the stockpot on medium/high heat, add a pinch of salt and pepper and let the potatoes come to a boil. On a side note, these potatoes are inspired by a version I saw Giada make on her show, Everyday Italian, on the Food Network.

While you wait for your potatoes to come to a boil, you should start on your gravy. Sorry I didn't photograph or add my recipe here, but like I said earlier, ask and you shall receive. 

Photobucket
When the potaotes have cooked, turn off the stove, and using a slotted spoon scoop out the cooked potatoes and place them in a large mixing bowl.

Photobucket
Add in the dill, salt & pepper (to taste), and olive oil, toss well and set aside until ready to serve.

Photobucket
Yum. Let's move onto the chicken.

Photobucket
Place a chicken breast inside a large piece of plastic wrap folded in half. The chicken should be in the middle well away from the edges.

Photobucket
Using a meat tenderizing mallet, gently hit the chicken thinning it out evenly into a 1/2 inch thick piece. Repeat until all your chicken pieces are finished.

Photobucket
Now, you can begin assembling your bread crumb coating. Place bread crumbs on a large shallow dish or plate.

Photobucket
Add in salt, pepper, paprika, onion powder, dried parsley leaf and cayenne. Using a fork mix the ingredients well and set this plate aside.

Photobucket
In another shallow dish, whisk together the milk, eggs and a pinch of salt and pepper (I like to lightly season both the bread crumbs and the egg wash), and in another dish add your flour. Your breading station is now complete.

 Photobucket
Heat the vegetable oil in a nonstick skillet on medium/low until the oil is hot.
I love the way the oil reflected images back in this photo like a pool of water!

Photobucket
First, dredge your chicken in the flour coating both sides well.

Photobucket
Then dip it into the egg wash, making sure to again, coat both sides.

Photobucket
Finally coat the chicken in your bread crumb mixture on both sides.

Photobucket
Place the chicken directly in the hot oil and cook until browned on each side (about 5-7 minutes per side) and  the juices in the chicken run clear.

Photobucket
Place chicken on a tray lined with paper towels and with another paper towel pat chicken dry to remove excess oil. Repeat these steps until all the chicken is cooked and patted dry. Serve your chicken with a large helping of gravy on top and a side of potatoes. So yummy!

Monday, May 16, 2011

Hummingbird Cake

Photobucket


A sweet southern favorite, Hummingbird cake! This cake is sweet, moist and topped off with a traditional cream cheese frosting. Hummingbird cake is a pretty simple cake to make, doesn't take much time and is definitely a crowd pleaser. I opted for baking today because for the past 5 days I have been sick. I think I'm pretty much out of the feverish stage, but I'm still  not feeling one hundred percent better and having a warm sweet cake to enjoy with all the hot tea I've been guzzling sounded like a good idea.

So what is hummingbird cake and where did it come from? Funny thing is no one really knows. The earliest printed recipe of hummingbird cake was published in 1978 in Southern Living Magazine by a woman known as Mrs. L.H. Wiggins. Many think the cake got its name because of its sweetness, some  believe it may have originated in Jamaica, what we do know is, this cake is delicious! I turned to my favorite southern cook Paula Deen, and followed a recipe of her's I found on Martha's website. I must say it turned out just right! 


Yield: One 9-inch 3 layer cake 
Photobucket
Here's a look at some of the main ingredients. For a complete list of ingredients click on the link below.
 View the full recipe here.

Photobucket
Although the recipe doesn't require you drain the crushed pineapple, I opted to do so. Even drained, the pineapple retains much of it's juices.

Photobucket
Using a food processor finely chop 1/2 a cup of pecans. 

Photobucket
Place the pecans in a bowl and set aside. Add 2 bananas to the food processor and pulse until mashed.

Photobucket
Next, prep your baking pans using butter and flour. You can also line with parchment paper if you like.

Photobucket
Here's the easy part about Hummingbird cake, you can start combining all your ingredients into one bowl at once. No muss, no fuss. It took a lot of strength for me to fight the urge to combine the wet ingredients then the dry as is often done when baking. 
I started with the flour and sugar...

Photobucket
Then added the remaining ingredients, pecans, bananas, pineapple, eggs, cinnamon, oil and vanilla. Stir to combine. I also added a 1/2 tsp. of allspice.

Photobucket
Divide the batter into your prepared pans evenly and bake at 325 degrees for about 25-30 minutes. The batter will be lumpy.

Photobucket
Remove cakes from the oven when an inserted knife comes out clean. Cool cakes completely. 
Meanwhile prepare the cream cheese frosting and set aside.

Photobucket
Once your cakes have cooled, you can begin to assemble the final cake. Begin by placing the first cake on a flat surface and using a serrated knife cut the crown of the cake making the top flat and even.

Photobucket
Spread a layer of frosting on the flat surface then top with the second cake.

Photobucket
Apply a layer of frosting to this layer as well, then finally add on the final cake.

Photobucket
Use the remaining frosting to frost the top and sides of the cake.

Photobucket
Ta-Dah!

Photobucket
I also added a little bit of unsweetened coconut to the sides. Place the cake in the refrigerator until you are ready to serve. Enjoy!